They gave me some good feedback such as going out and testing my game in an actual classroom environment. Because I do not live at home during the college term I wasn't able to access a primary school that would be familiar with me straight away but instead with the help of my sister who is a secondary school teacher, I was able to try the game out using a first year group. They were between the ages of 11-13 and just after leaving primary school. My game was aimed at younger children but I was interested to see how it would go down in the classroom and if it would work properly. I gave the teacher a rundown opn how the game worked and she was able to present it perfectly to the kids, I recorded the game in progress and it can be seen in this video below.
Once the game was over I handed out a short survey to each student just to give me an indication of what they thought about the game and to see if they could suggest any improvements for me to work on. Here is a copy of the survey I made out:

I could see improvements that had to be made to the game just by evaluating it myself while it was being played, and then the answers the kids wrote on the survey confirmed this for me. There were 19 surveys filled out in total. Here is a summary of the feedback I received:
Did you enjoy this game?
- 16 said yes.
- 2 said it was ok, but too easy.
- 1 said it was boring because they got one of the first cards and lost interest after that.
After playing this game do you feel you now know basic First Aid skills?
- 14 said yes.
- 3 said yes but they had a knowledge of the skills before playing the game.
- 1 said they now know what to do when someone is choking.
- 1 said they now know the skills a wee bit better.
- 15 said yes.
- 3 said yes and included that it was a more fun way to learn, it would be good for younger children and that the stories helped to teach good skills.
- 1 said no it was too easy.
- 8 said no and 1 included that it would be fun for young children.
- 9 said make more flashcards and less of the same one, make more stories and make it more difficult.
- 1 said show a video to show exactly what to do in the emergencies.
- 1 said make it less boring.
- 2 said no.
- 3 said they knew most of them.
- 2 said they knew to ring 999 in an emergency.
- 2 knew how to deal with a choking person.
- 3 knew 3 of the skills.
- 4 knew 2 of the skills.
- 3 knew 1 of the skills.
Now I intend to make up some stories for children between the ages of 4-8yrs and also make up some stories for children between the ages of 8-12yrs. This should accomadate all children in primary school. A junior version of the game and a senior version.
I also aim to make alot more flashcards, I want each child to be giving 2-3 flashcards during the game, depending on the number of kids in the class. This will prevent them from losing interest in the game if their card is called out first, they will have another card to show later on in the game and this should keep their attention levels up. Perhaps it would be a good idea to give each child a card belonging to each story so they have to pay attention for all stories throughout the game.
These 3 postcard images below sum up my project and my aims to get me to the finished product:


Here is my Gantt Chart for the semester, this is to help me keep on top of things:

Here is my Gantt Chart for each week, it shows the hours I plan to work on the project. 33 hrs plus in total:

I plan to do two versions of this game. One for juniors aged 4-8 years and one for seniors aged 8-12 years. For the junior version I am going to teach them how to deal with a cut, a burn, a nosebleed and a fainting person. I got my information for dealing with a cut and a burn on the HSE website under public information and child saftey - first aid. Here is the link to the page : http://www.hse.ie/eng/services/healthpromotion/ChildSafety/csap_f_aid.html
I got my information for dealing with a nosebleed and a fainting person on the webMD website under first aid and emergencies. Here are the links:
For the senior version I am going to teach them how to deal with a choking person, a sprain, a poisoning, a stroke and an insect sting. I got my information for dealing with a choking person, a sprain and an insect sting on the webMD website. Here are the links:
I got my information for dealing with a poisoning on the website wikihow under first aid and emergencies. Here is the link:
I knew myself how to deal with a stroke from the popular TV adverts and Posters. I changed the 'T' to 'Tongue' as this is a new symptom which they have discovered for stroke victims. They need to check to see if the tongue is lying to one side in the mouth.

Here is my presentation for week 4 roulette presentations:
I've spent some time making up some stories for the game and these are the ones I've decided on so far. I will make a flashcard for each word I have in red. The junior stories have less text than the senior ones and there is also a variation in the vocabulary used. Here are the junior stories for 4-8 years:
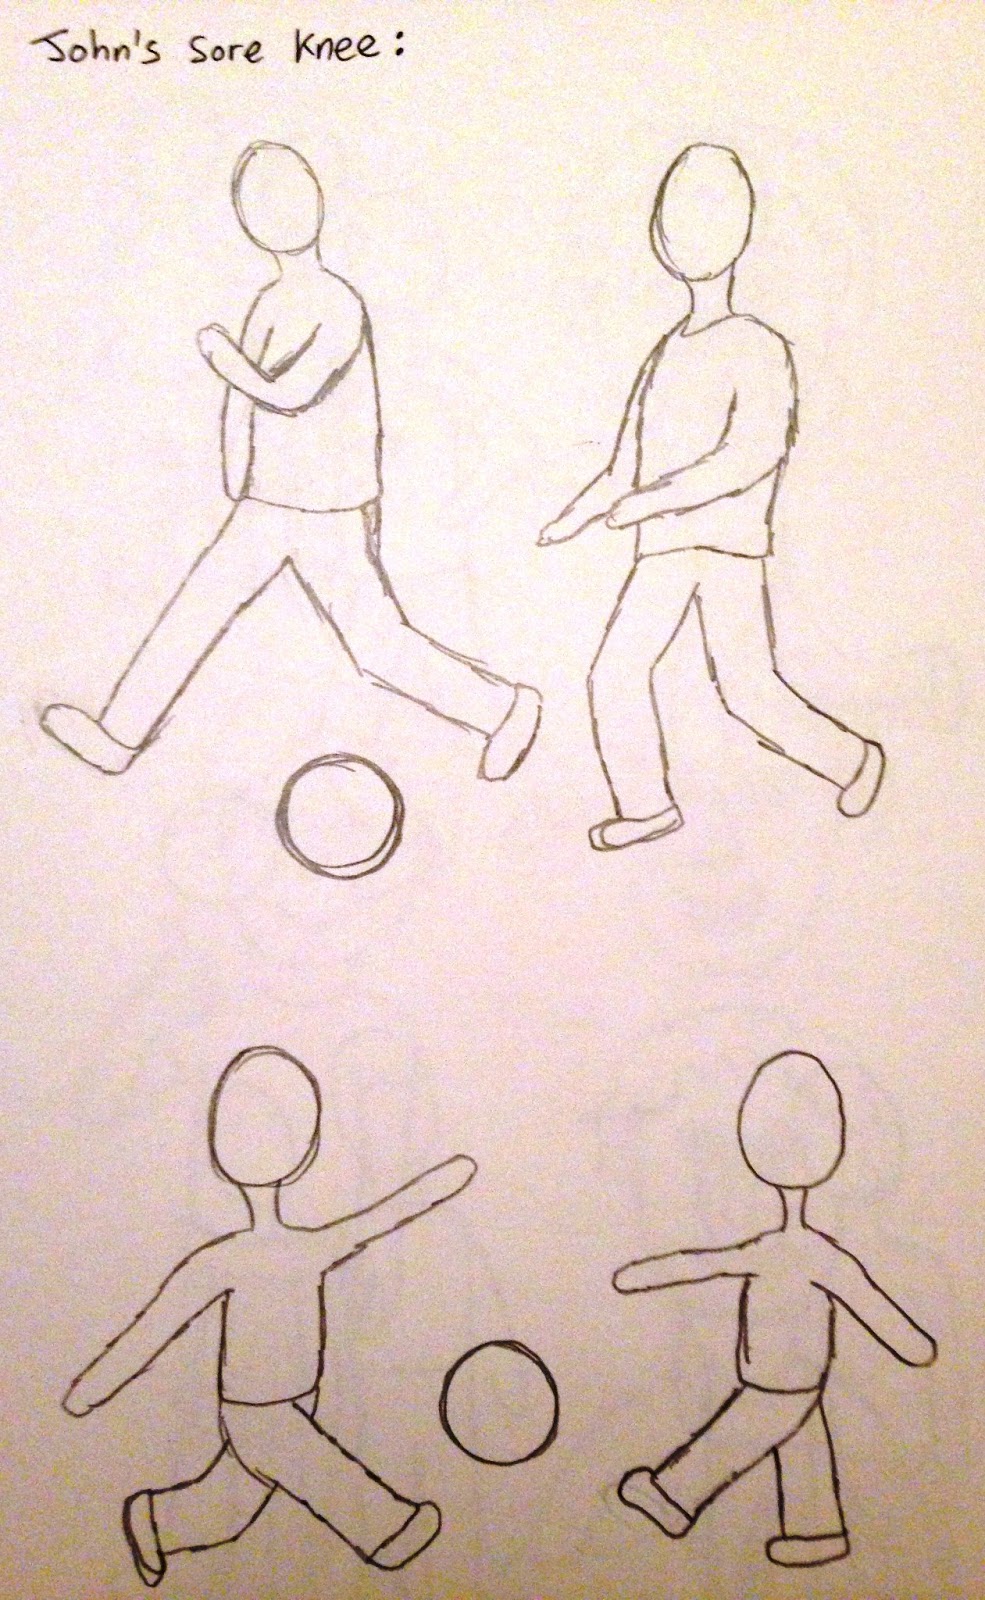
John’s Sore Knee – Cut
One day John
and Martin were outside playing football. John was running too fast and he fell
and cut
his knee. Martin saw that John’s knee was bleeding. He took him inside and washed
out the cut. He used water to wash it. He dried
the cut with a cloth. He then put a plaster
on it. John was all better again.
Susie’s Accident – Burn
Susie’s mum
had friends over for tea and Susie wanted to drink tea with them. Her mum said she
could have some but she had to be careful as the cup was hot. Susie didn’t listen
and grabbed the cup quickly. She spilled the tea onto her arm. She had burned
herself. Her mum took her to the sink and ran cool water on the burn. She then
covered the burn with cling film and called 999. They waited for the ambulance
to come.
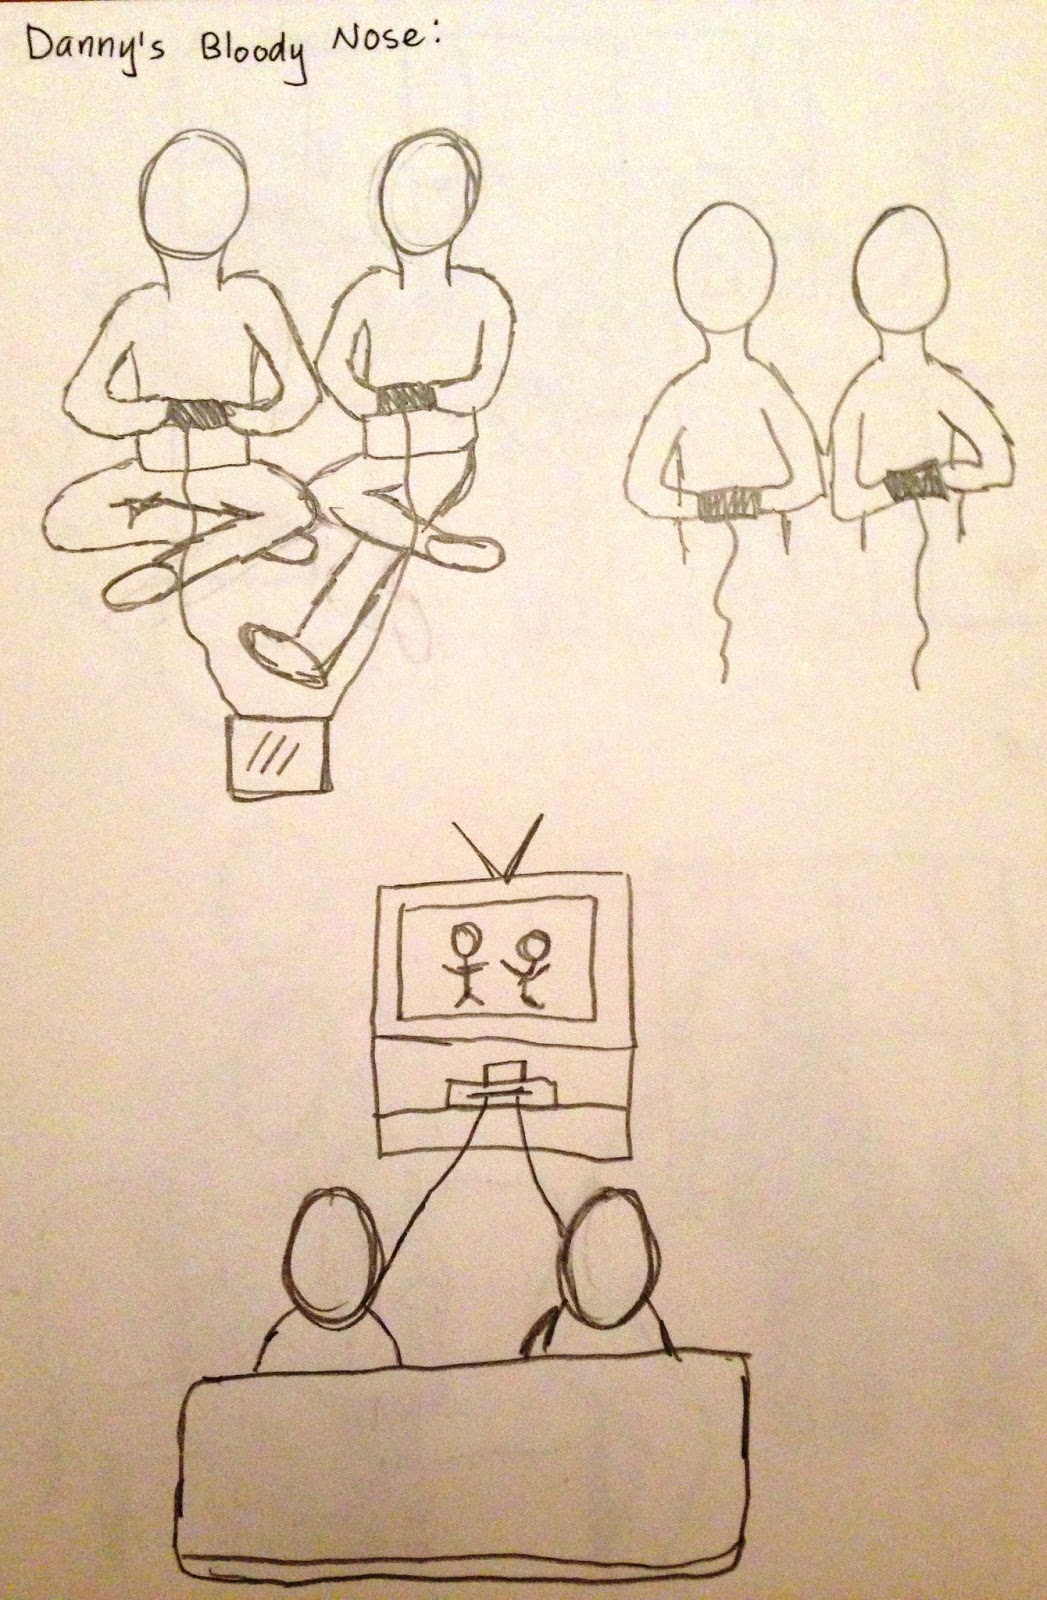
Danny’s Bloody Nose – Nosebleed
One day
Danny and Mark were playing computer games. Suddenly Danny’s nose
began to bleed. Mark knew what to do. He told Danny to pinch the soft part of his nose. He
told him to tip his head forward. Mark went and got some ice to put on his
nose and cheeks.
Danny had to hold his nose for 10 minutes and it stopped bleeding. He would have
to hold it for longer if the bleeding did not stop. Or else ring 999 for
help.
Cousin Jack Faints – Fainting Person
Last week
Mary went to visit her cousin Jack. Jack was going to get some sweets for Mary
but when he stood up he fainted. Mary ran over and put him lying flat on
his back. She then got a stool and put Jack’s feet up on it. His shirt
seemed tight around his neck. So Mary loosened the buttons. She then began to shake him
and call his name loudly. Jack began to wake up. Mary got him a fruit juice
to give him some energy. If Jack didn’t wake up Mary would have to get the phone
and ring 999.
Here are the senior stories for 8-12 years:
Greedy Tom – Choking
One
day Tom and Liam went to the shop to buy some sweets. They were going to eat
them when they got home but Tom was greedy and couldn’t wait. He grabbed a big
handful of sweets.
Then he stuffed them in his mouth all at once. When they got outside Liam noticed Tom was very quiet. He then realised
he was choking
on a sweet. Liam hit Tom firmly between his shoulder blades five times. He was
still choking so Liam held Tom around his waist. He pulled inwards and upwards above his belly button.
The sweet still didn’t move so Liam ran into the shop and told the lady to call
999. He then went back outside to repeat the Heimlich manoeuvre until the
ambulance arrived.
Jenny’s Birthday – Sprain
On Jenny’s
fifth birthday all her friends came over to play. They went outside for a game
of chase. Jenny was running too fast and she fell over twisting her ankle.
Her big sister could hear her crying so she ran outside to see what happened.
She could see that Jenny’s ankle was swollen. She carried her inside and told her to rest her
foot and not to move it. Then she got an icepack and placed it on the swollen part of her
foot. She wrapped a bandage around her ankle. Then she got some cushions
and raised Jenny’s foot up. They
watched some TV and waited to see if the swelling would go down. If
not they would call 999 for more help.
Nosey Peter – Poisoning
Shaun was
looking after his little brother Peter. Peter was always getting into trouble
because he was so nosey. Shaun was watching the TV when he heard Peter banging
the kitchen cupboards.
He went to see what he was looking for. When he got there Peter was on the
floor looking very sick. He had drunk some bleach that he found under the sink.
Shaun knew this would poison Peter so he rang 999 straight away. He
followed the guidelines
the person on the phone gave him. He made sure Peter didn’t eat or drink
anything. He was also told not to make Peter vomit. Shaun kept the bottle
of bleach that Peter drank to give to the ambulance crew. They waited for help
to arrive.
Katie’s Visit to Granny – Stroke
On Easter
Sunday Katie went to visit her Granny. They decided to have some tea and buns.
Katie was telling Granny a story when she noticed she wasn’t listening to her.
All of a sudden Granny dropped her cup of tea. Katie ran over to her and noticed her
face
had fallen on one side. This was a main sign of a stroke so Katie checked for some
other symptoms. She asked Granny if she could rise up both arms. Granny struggled with this
task. She then asked her to talk and her speech was slurred. Then Katie
checked if her tongue
was lying to one side and it was. She rang 999 straight away and told them to
come quick because her Granny had all the symptoms of a stroke.
Lisa and Gemma’s Picnic – Sting
After I had completed the stories and picked out which words were going to be made into flashcards, I was able to start sketching illustration ideas for each word. Here are some of my ideas from my sketchbook:


After I had all the primary drawings done I chose one final idea for each flashcard. I then done some secondary drawings for each card and scanned them onto the computer:


I then took the drawings into illustrator and drew over them using my graphic tablet. For alot of the drawings I used basic shapes like circles and squares to make up most of the lines of the object. Then removed excess lines and added other ones. Here is a little video I made to give an example of what I mean by using different shapes to make up my illustrations:
Here are two screenshots to show how I used basic shapes to create my illustrations:


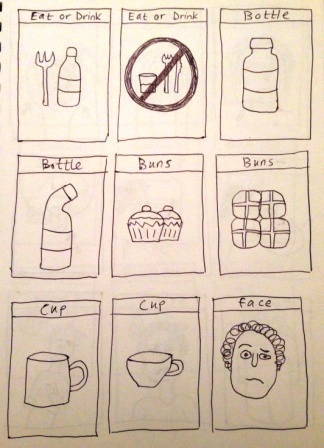
This is what my flashcards look like to date:


When I was struggling to find the right shapes on certain cards I would create a few and place them alongside the card. Then move each one in on turn to see which suited it better.


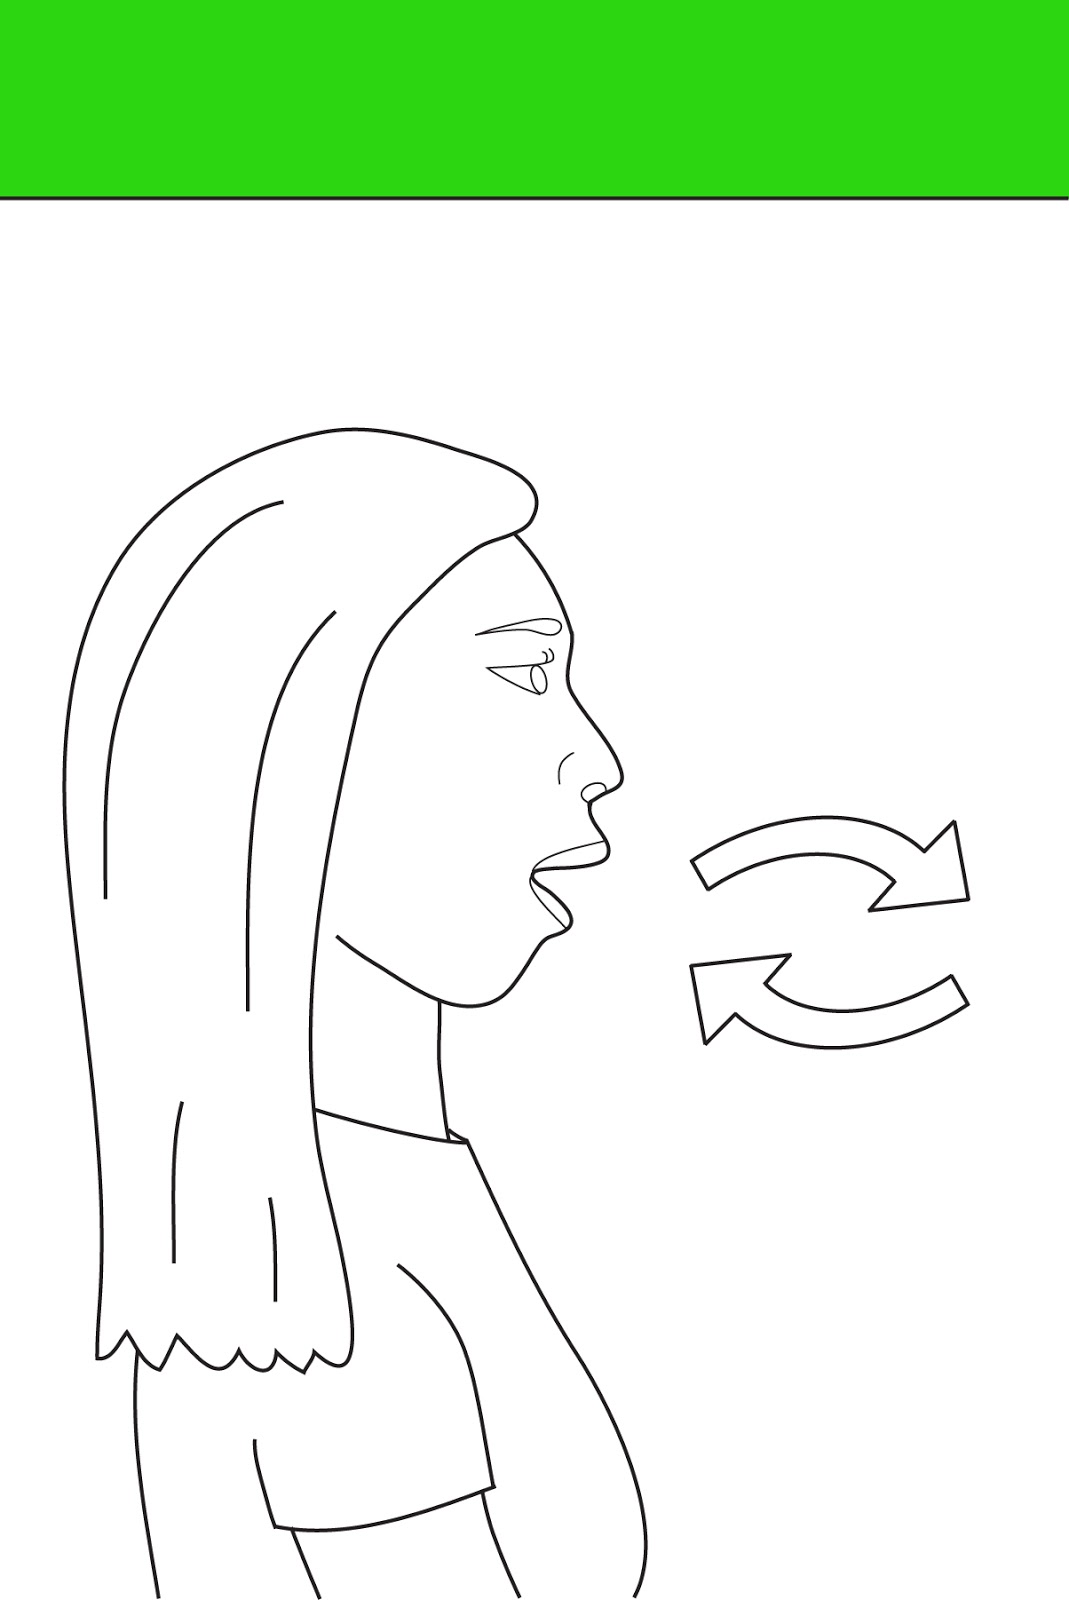
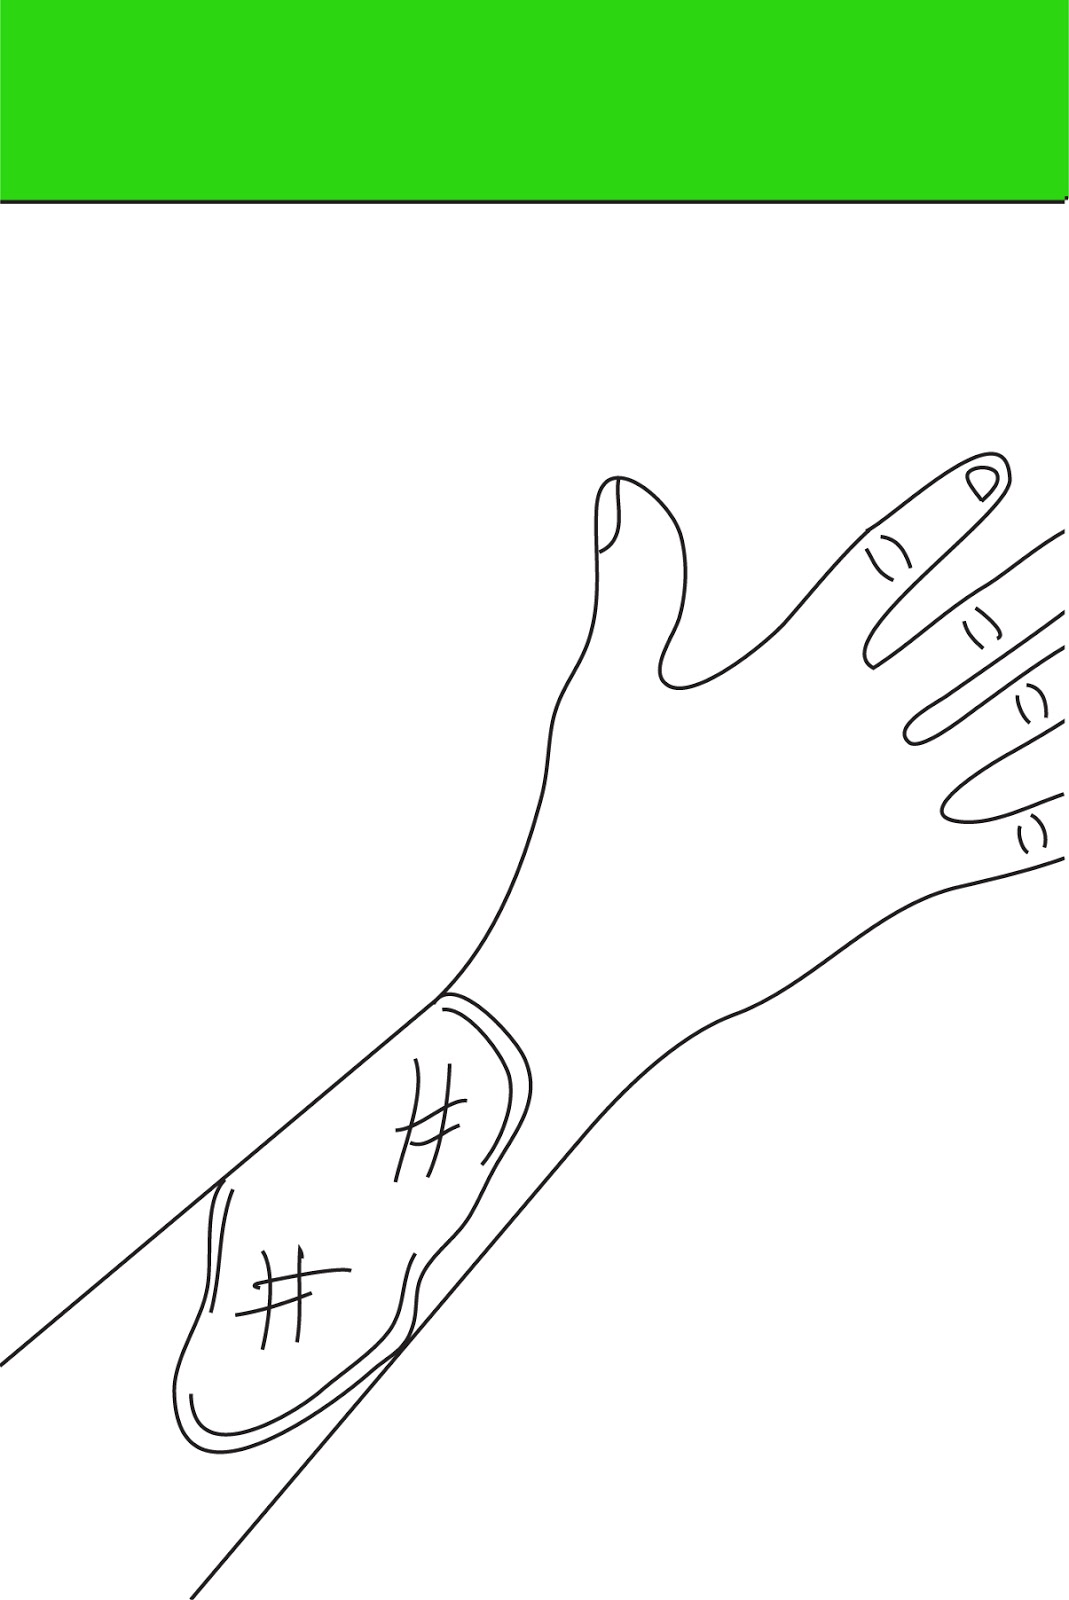
When I showed my flash cards in class there were a few changes I had to make. It was suggested that I add 2 arrows pointing to the belly button, to emphasise the fallen face more of the stroke victim, to make the vomit card a little less drastic, to use the whole hand and then point to a finger nail for the finger nail card, to change the direction of the arrows on the breathing card and also to change the view of the fainted person to make it look like he was lying on the floor. I also changed the nose card to a full face with an arrow pointing to the nose instead of just the nose itself as it would be hard for me to add the colour properly when the nose had no closed lines. These changes can be seen on the new cards below:


When I was adding colour to the flashcards I noticed an ear missing from the boy on the forward card. I added this in and also tried some variations of the waist card as I wasn't sure which one would work best.


I decided to go with the last card that just contains the arrows pointing to the boy's waist. As I felt the arms on their own looked a bit weird and then the one with the other boy in it made it too simple for the kids to guess the right card. In the story the line says 'Liam held Tom around his waist.' So the children would know the waist card straight away when they would see the other boy holding Tom, therefore I am going to use the card with the arrows pointing to his waist to make them think a little more about the answer.
Below are my complete 60 flashcards with colours and text added:


I am including some illustrations to the presentation that goes along with the game. This will prevent the children from getting bored with the text on the screen, they will be able to get a better idea of the story through these illustrations. I just want to add in some simple illustrations here and there throughout the text. Below are some examples I was looking at:


I was also thinking of making my presentation look more like a storybook with turning pages rather than a basic slide show. After each gap in the story there is a question to prompt the kids to guessing the right answer, then there is a reveal to see if there card was right or wrong. Therefore I would need spread the text over two pages and on some spreads have the text on one page and the illustration on the other. Then the reveal can be made by turning to the next page that would contain the correct flashcard and the next part of the story. I was looking at some illustrations done over a two page spread:


So I started sketching out the characters I had drawn on my flashcards. I needed 4 main characters, a boy with short hair, a boy with longer hair, a girl and an older woman. I could then adjust these characters and create changes to make them into the other extra characters in the stories. Here are some sketches I done:


I started creating some storyboards for my presentation. This helps me to plan everything out and I know exactly what goes on which slide when I'm making it. Also it helped me figure out how may illustrations I would need in total and what they were going to be.


I have 3 illustrations to do for each story, so in total that is 27. I started sketching out some ideas for each of them:


Now that I have all my illustrations sketched out I can scan them onto the computer and start building them up in illustrator.
Here is my presentation for week 8 roulette, I didn't get to present but I did win a nice big bottle of bubbly!! :)
Here are some of my illustrations when I had finished them in illustrator, before I added the colour:


I then took my illustrations into Photoshop and added colour, here they are finished for my storybook presentation:


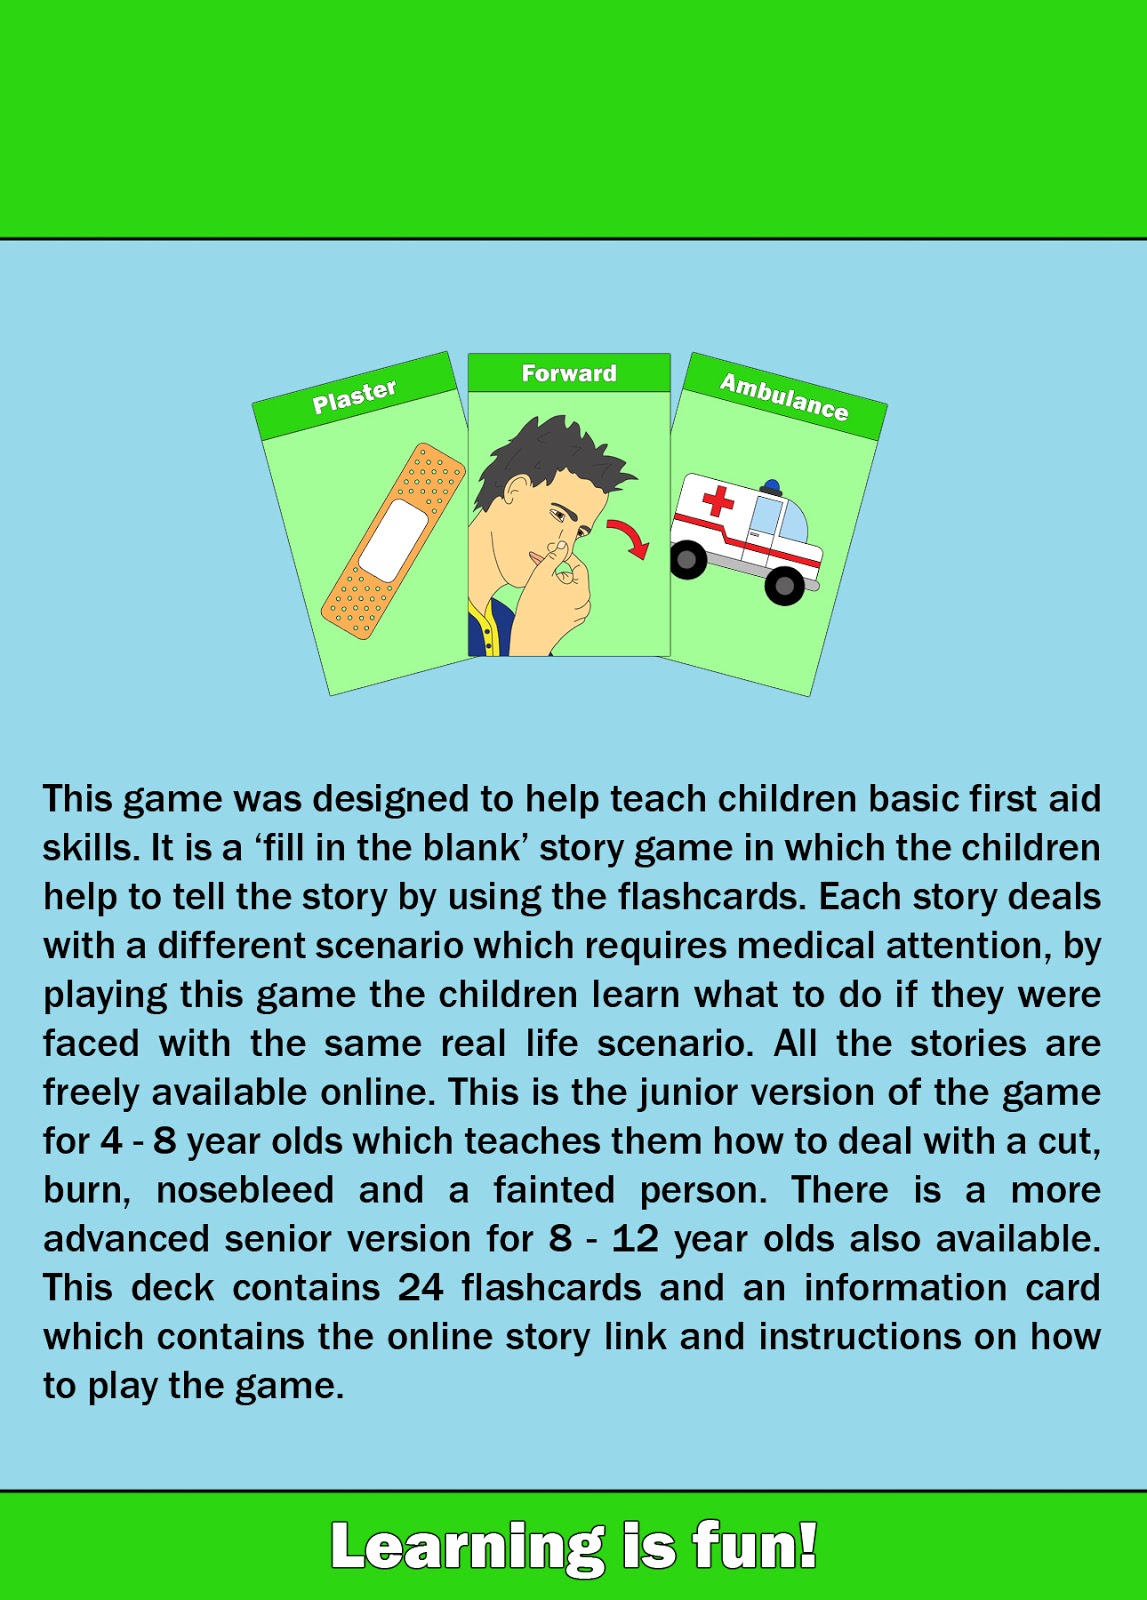
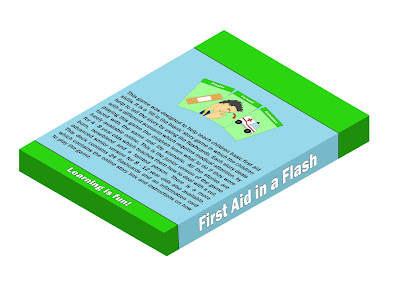
I needed a name for my game so I started brainstorming in my sketchbook and came up with 'First Aid in a Flash'. It was now time to start working on the packaging. I was researching some flashcard boxes that are already out there. Because this game was designed for school use and it would be passed through many hands I thought these tin containers were a good idea as they would be most durable:


Realistically I'm not going to be able to produce tin containers for my flashcards so I'm going for a standard cardboard box like these:


Because my game requires on average 5 decks of cards for the classroom and also because there are two versions it would be nice to have all sets come in one big box like these:


When I had worked out the measurements of my packaging I started drawing up some templates and ideas for the graphics:


I then drew out a template to the exact scale, cut it out and put it together to see if it would work. It fitted together well:


I then started working on the graphics for the packaging, I started with the front cover first. I had drew out some sketches so I knew what I wanted to put on it. I wanted it to run with the same green banner along the top that I have on the flashcards but I wasn't sure what colour would mix well with it, I experimented with a few:


I decided to go for the blue colour as I wanted to put some of the original flashcards on the back and they contrasted best with the blue. I then started working on the back of the packaging. I thought I would be able to give the instructions on how to play and explain what the game was about on the back but there was too much text. So I decided to put some information about the game on the back and then make a basic information card with instructions on how to play the game to be included with the deck of cards inside the box.
This is the information I decided to put on the back of the junior box:
This game was designed to help teach children basic first aid skills. It is a ‘fill in the blank’ story game in which the children help to tell the story by using the flashcards. Each story deals with a different scenario which requires medical attention, by playing this game the children learn what to do if they were faced with the same real life scenario. All the stories are freely available online. This is the junior version of the game for 4 - 8 year olds which teaches them how to deal with a cut, burn, nosebleed and a fainted person. There is a more advanced senior version for 8 - 12 year olds also available. This deck contains 24 flashcards and an information card which contains the online story link and instructions on how to play the game.
And this is the information for the back of the senior box:
This game was designed to help teach children basic first aid skills. It is a ‘fill in the blank’ story game in which the children help to tell the story by using the flashcards. Each story deals with a different scenario which requires medical attention, by playing this game the children learn what to do if they were faced with the same real life scenario. All the stories are freely available online. This is the senior version of the game for 8 - 12 year olds which teaches them how to deal with a sprain, poisoning, stroke, insect bite and a choking person. There is a less advanced junior version for 4 - 8 year olds also available. This deck contains 36 flashcards and an information card which contains the online story link and instructions on how to play the game.
So this is what I came up with for the back of the packaging for both versions of the game:

This is the information I put on the instruction card that would come inside the box. For now I have just put in www.example.com for the online link as I do not have my storybook presentation completed yet and do not have the proper link:
An average classroom works best with 5 decks. Divide the classroom into 5 teams giving each a deck of cards. Let them spread the cards out on a table facing upwards so they can all see what is on each one. Simply log on to www.example.com to access the online storybook that accompanies this game. The teacher then starts to read the story to the class, when they come to a blank space in the story there will be a question to prompt the children to choose the right flashcard which fits the blank space correctly. The teacher asks the question and the first team with their hands up with the correct flashcard wins a point. The teacher then continues on with the story until another blank space appears. The points are added up at the end to see who the winners are.
And here is the completed card following the green banner theme also:

I made these sides for each box then, the senior version being thicker than the junior as it will have more cards and different thickness of green on the ends for the right and left side of the box. (To match up with the green thickness on the front and back of the box) :
Now that I had all my graphics for the packaging completed I went into illustrator and made up both box templates. Here's what they looked like:


I then went and added all my graphics to the templates and this is how they turned out:


It was now time to start my online storybook that goes along with the flashcards. Previously I had just used prezi and made a basic presentation but this time I decided to turn it into a storybook with flipping pages. So I searched for ways to add a flipping page effect to PDF's and also looked for different software but they all came at a price. Eventually I came across this great site called www.flipsnack.com which turns your PDF file into a fully working online flip book for free! Here is a test book I done using a few of my illustrations just to make sure it was suitable for what I needed before I got down to business.
Now that I knew it would work perfectly for me I got to work on the front covers for both books. I just stuck with the same idea I used for the front of the flashcard packaging. Each pack of cards would then be easily linked to the right storybook. Here are the two front covers and the back cover:


I started working on the pages for the books in Photoshop, each page is 20cm x 20cm. Here are a few examples of some of my pages:


Once I had completed all the pages of the storybooks I put them altogether into a PDF file and uploaded them to flipsnack. Click on the link below to see my online junior storybook:
Click on the link below to see my online senior storybook:
Here are some 3D boxes I made up in Illustrator to show how the packaging would look when the template was all put together:


I tried out different fonts for the packaging and used the front of the box as an example as it contained the most text:


I looked through some children's storybooks to see how they emphasise certain words, I wanted to see what this would look like on my online storybook pages. The important words are usually bigger or in a bold font, so I tried this method on a few of my storybook pages. Some using a bold font and some using a larger font, I picked out the important words that should stick out in the child's mind when the story is being read to them.


I printed out 2 sets of junior flashcards and made up some mock up packs to present to Niall Clancy from First Aid Aware. This was to give him an idea of how they would look in reality.


After experimenting with different typefaces for my packaging it was suggested that I make 'First Aid' a bigger main heading and then add 'in a Flash' as a smaller sub heading to the packaging. I decided to go with Arial rounded for the main heading as I felt it was a nice soft looking type for a child's product. I then experimented with the sub heading in different script style fonts and tried them out in different locations. Firstly making the green banner at the top of the box bigger and placing both headings inside it:


I then made the green banner a bit smaller and tried overlapping the sub heading between the green banner and the blue part of the box:


I preferred the overlapping sub heading and felt the Damion script font suited the Arial rounded heading the best, over all I think these two fonts looked good together. I also made the green banner along the bottom of the box a bit bigger and moved the text up so it wasn't to tight to the bottom. The final outcomes can be seen below:


I decided to rework the design of the back of the box also. I enlarged both green banner top and bottom to match up with the front banners. I then made the trio of flashcards bigger and overlapped them onto the banner and the blue part of the box. I made the first sentence of the text larger to catch more attention and then made the rest of the text that bit smaller. I also added a faded glowing box behind the text so it could be seen more clearly, I have seen this on other flashcard packaging also. I then placed my name on the box at the bottom. Also all text has been changed to Arial rounded:


Because I had changed the fonts and the size of the green banner I then had to rework the sides of the boxes to make them fit together properly:
I then had to update my box templates in Illustrator, this meant changing all the graphic panels to the new design:


I wanted to show what the boxes would look like in 3D, I had mocked them up in Photoshop previously but they weren't very accurate so I looked up YouTube for a tutorial on adding artwork to a 3D object in Illustrator. I came across this very helpful tutorial:
After following this tutorial and making all my graphic panels into separate symbols I was able to create the 3D box to the exact size it would be in reality and then add my graphics, I also made the side panels and bottom panels darker in Photoshop to make the box more realistic looking. Here's how they turned out:


Here is my presentation for week 12 roulette presentations:
I had a meeting with Niall Clancy again from First Aid Aware and we started from the beginning and went through my stories to see where the changes had to be made. My scenarios had to match their training protocols and how they would deal with the accident or emergency. I had to make some changes throughout the stories and I also had to make 2 new flashcards, one for 'breathing' in the senior version and one for 'CPR' also a senior card. Niall wanted me to change the storybook to a slide show, he wanted each sentence of the text to come in individually and also have the question at the end of each paragraph fade in so the children couldn't read ahead or cheat throughout the game. He wanted me to save the presentation onto a CD or USB Stick instead of having it available online as he said some rural schools may not have access to the internet.
Throughout this time the printing company (Jay's Printers) myself and Niall had agreed to use decided to close and were not re-opening until the day before my deadline. This was a MAJOR problem, I searched the country and the UK for another suitable printing company that matched the price of Jay's printers. And thankfully I found one that was even cheaper, Hackett Reprographics in Dublin. It was a mad rush to get the new cards made and get all the artwork ready for print but by putting in one long night I had all ready to send to print by the morning. Now all I had to do was wait and hope they would arrive before my deadline! I then began working on the new stories. My new cards can be seen below:


After changing the font to Arial Rounded and Damion on the packaging I also changed the font on the flashcards and the stories. Here are a few examples of the flashcards with the new font:


For my new slide show storybooks I used the font Damion for all the titles of the stories, I used Arial Rounded for all the body of the text and I added a wooden background to all the pages with the flashcards on them. Because the kids would have their flashcards placed out on the table I thought this would link in nicely when the reveal card would be shown on screen on a table also. I made the important words in the stories twice the size of the original text so the children would remember them better. Here are some screenshots of the new pages:


Here is a quick flick through video off my new junior storybook, just to show how the text appears and also how the question fades in:
Once I had my storybooks finished I burned them onto a CD and made a cover for it, this can be seen below:

I then made a video to show how the game would be played in a classroom, this is also saved on the CD. It can be seen here below:
So at long last the day before my deadline all my beautiful flashcards and packaging arrive!! I am over the moon with the way they have turned out and I can't stop taking photo's of them all. This project has had highs and lows but I'm definitely leaving it on a high and now I need a break!! (Oh and excuse the dreadful table cloth)


So all my stuff to hand in, blurb book, CD with stories and promo video, both packs of flashcards junior and senior:

No comments:
Post a Comment